The first step in this project involved cleaning off my table. It actually looks pretty good this time. Is your's clean?
 Ok, the work area is neat and we have already decided on our fabric and got the store to cut it to the width we want. Our next step is to even up the edges. You might think that if you had it cut to the desired width at the fabric counter, it will be even...not necessarily so, for a variety of reasons. If you ask nicely, they may even it up there at the cutting counter for you, thus eliminating this step. It's not crucial that the edges be perfectly straight, but my fabric really needed some help. So let's gather up our tools, scissors, a ruler and if you are using a cutting wheel, a self healing mat.
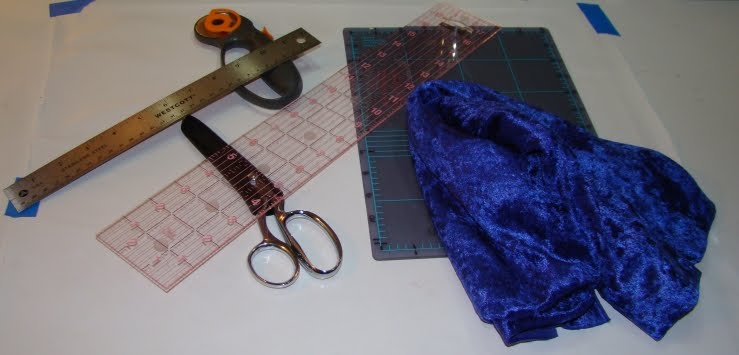
Anyway, what I do is take my fabric and fold it in half and make sure there are no wrinkles and then take it to the cutting mat and straighten it up either with your cutting wheel, which you should already know how to use, (if you don't know how to use a cutting wheel, please don't buy one for this project, they are very sharp and dangerous) or with your scissors. Most of us have handled fabric and know how to do an accordion type fold and are able to achieve this next step.
 You place the ruler to the the shortest edge that is closest to the "body" of the fabric, line up your ruler and either cut with your wheel, or make a mark along the edge of the ruler, then pin and cut with scissors.
Depending on the fabric, you could actually be done at this point. The fabric I chose, doesn't ravel, and is in fact, stretchy enough that the edges curl in slightly and that eliminates the need to finish the long edges. So you could actually wear your scarf at this point. Really, you can.
If you want to put some fringe on the ends, you can go several ways. You can purchase pre made fringe, or you could buy pre-beaded fringe from Michaels. It is easy to pin and then sew on. You might be able to use fabric glue, if you don't sew, but I'm not sure about that. If you choose a non ravel fabric you can simply cut the edges and make fringe. Like I did on this scarf made I from polar fleece, where all I did was cut the ends in 1/2 in strips for a fringed look.

But on my crushed velvet scarf, I felt the need to embellish the ends a bit. First off, I chose my thread, finding the perfect match...
 The top right spool was an exact match. Since I am going to make my own bead fringe, I decided to turn under about 1/4 " on each end and top stitch it, giving me a good base for my fringe.
 After top stitching both ends, I went to my stash of seed beads and picked out several tubes that I thought would compliment the fabric. I didn't want to go "matchy-matchy" on the beads.
 I then proceed to make beaded fringe for my scarf. Making bead fringe is quite easy once you know how. There are several on line tutorials (this is a fun one) for bead fringe, it just takes time, patience, beading thread, the proper sized needle and good vision to thread this tiny eyed needle.
My finished scarf is perfect. It is comfortable and the slight weight of the seed beads makes the ends of the scarf lay perfectly in place.

Hope this little tutorial made sense. The next scarf I make will be the type that you pull threads from the ends of the fabric and then twist and tie to make fringe. If anyone wants to see how I do that, let me know.
That's it for now. Hope everyone is geared up for a new week, a new day or just a new thought. Take care and have fun.
4 comments:
I love them both, but especially the velvet!
I am knitting two scarves, and it's taking a really long time!
I think I'll make some fabric scarves next.
Thanks for the inspiration!
Oh I love the velvet one
The velvet scarf is yummy, but I love the no sew. I am going to the store today and get some polar fleece. This is a great gift idea! Thank you for the tutorial and the inspiration! I would love to see the other fringe!
It's gorgeous! I'm going to be sure to show my daughter when she comes home from college. It could be a really fun project!
Post a Comment